


Headless Screen Testing for Infinite Scroll .. How does that work?
Headless Screen Testing for Infinite Scroll .. How does that work?
Notes on React Native Integration Test Development for Infinite Scrolling of the Playlist Detail Page
Introduction
The following notes are meant to capture some of the approach, additional issues and challenges of building integration tests for the Infinite Scrolling of the Playlist Detail Page. Multiple topics are covered:
Mocking Apollo interactions,
Some of the Boundaries and Nuances of UI testing with the headless Jest/RN test library frameworks
Some performance notes on this combination with respect to these frameworks
This blog is derived from a previously written quip document: Notes on React Native Integration Test Development for Infinite Scrolling of the Playlist Detail Page feel free to comment into that document to ask questions (as this blog mechanism doesn’t support discussions yet).
Background
First, checkout the notes for Infinite Scrolling: Notes on InfiniteTrack scrolling for PDP
The MR-165 is meant to attempt to test various integration test scenarios that were manually found and detected while developing the initial version of the infinite scrolling capability. This is an integration test in the sense that it is testing the integration of PDP with the underlying Bauhaus table/list components as well as the Apollo client used to both get results from FireFly and to hold in its cache the growing result set of tracks that are being scrolled over. Hence, this test mocks the FireFly service request/responses using the Apollo MockProvider component (see https://www.apollographql.com/docs/react/development-testing/testing). So much of this is pretty straight forward: mock those responses and then check to see if the software is integrating properly with both Apollo and with the underlying FlashList (and/or Bauhaus components).
We are motivated to double down on automated testing because this has been historically a weak point for Amazon Music visual clients. Developing high quality integration and unit tests should be a priority for all Experience developers. In this blog we explore not only how this is done but also some of the boundaries of testing “what is on the screen?” in a headless test framework.
A couple of basic tests
This MR starts with two basic tests (as seen in detailPageScrollActions.test.tsx:
When the page loads it should have pulled over 25 tracks.
When the user scrolls down, then another 25 tracks are loaded.
Scrolling down item by item
The Apollo MockProvider
The tests leverage the Apollo MockProvider which mocks their corresponding ApolloProvider. It uses a mechanism that allows you to create responses for specific graphQL queries. We use this as the cursor values and results change throughout the scrolling tests. In addition, we leverage the ability to pass in an Apollo InMemoryCache object into the provider, which is critical to verify that the cache is getting updated properly. The tests probe that the expected number of tracks are in the cache object in addition to validating what is one the screen.
This mechanism works pretty well, but has a couple of weaknesses:
Mismatches of the actual GQL and the mock response lead to odd failures. This weakness is called out in the blog (The Do’s and Don’ts of Testing Apollo in React) and it was amazing that it happened within a day after checking in the initial tests. But there has been some improvements to prevent this. See FAQ-0 below for the issue.
Simulating network latency: The MockProvider also doesn’t allow for injection of additional latency to use this mechanism for certain types of performance tests that focus on that aspect.
React Native Testing Library Scrolling Support
The React Native Testing library is a headless (i.e., screenless) framework that allows one to test React Native components by simulating aspects of a screen. This has a huge advantage over end-to-end testing (which is done with an actual device or a mobile phone VM) due to its ability to be included in a Continuous deployment pipeline. Such a simulation is imperfect, however, and the limitations and/or nuances of that are unclear. In this section we discuss some of the learnings when implementing the scrolling-based tests.
Background
First, lets just briefly outline how the infinite scrolling mechanism currently works (as of April 15, 2023):
Firefly will bound the maximum of tracks for any request to be 50. One can ask for less, but if more than 50 are asked for then the returned number tracks are limited to 50.
Firefly offers a relay-style cursor mechanism for paging through the results and getting additional windows. That mechanism uses a
pageInfostructure with ahasNextPage(boolean) andtokenelements. The former is some state to let the caller know if there are more pages after this one, and the latter is state that the client will use in the next request to get to the next window of tracks.The underlying virtual list component is implemented by Shopify’s
FlashListwhich is a more performant virtual list than the standard React NativeFlatList. They provide a call back functiononEndReachedthat will be called once the user scroll’s a certain way down the list.In this callback code the
fetchMorePlaylistTracksApollo callback function is called (defined via theFetchMoreparameter of ApollouseQueryfunction). This callback also leverages anonUpdatecallback to merge the current retrieved tracks into a larger cached track array object. Hence, essentially a chain of three callbacks are put into motion: (1)onEndReachedfrom FlashList, (2)fetchMorePlaylistTracksa laFetchMorefrom Apollo to call FireFly, and (3)onUpdatefrom Apollo to update the cached object. This is illustrated below.The current cursor state is also maintained in the Apollo cache as is the rest of the standard playlist metadata.
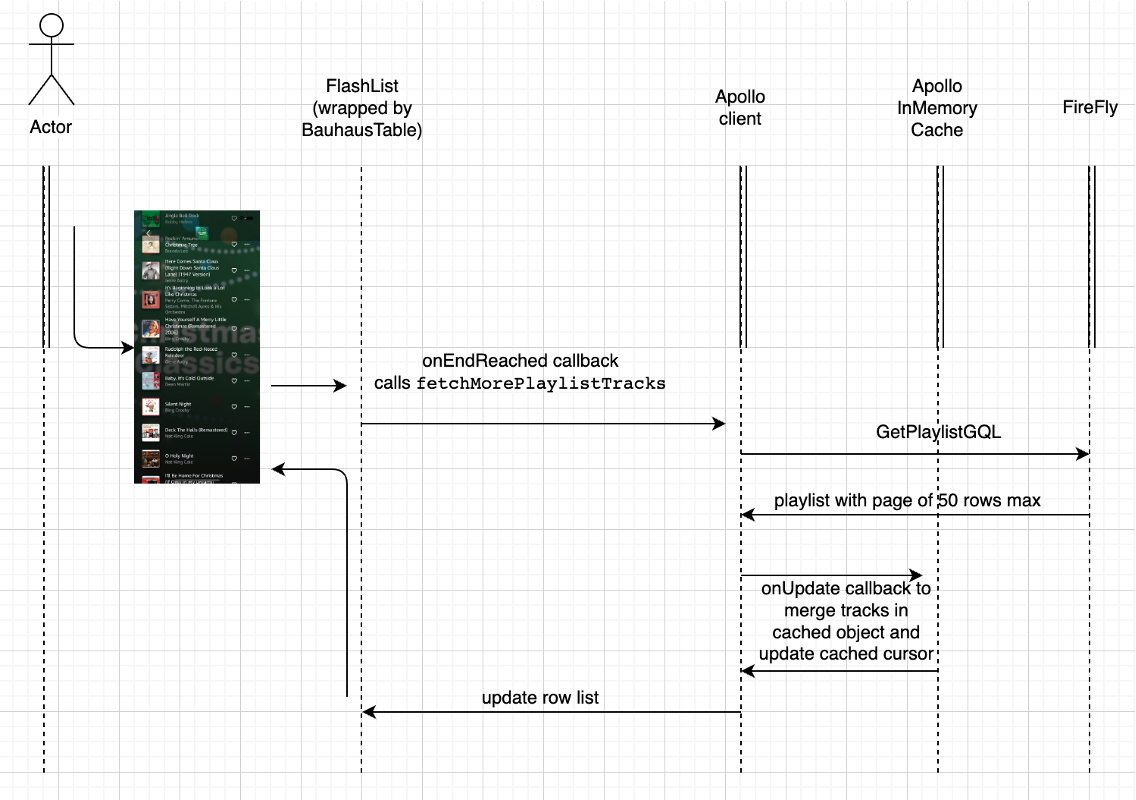 Figure 1: illustration of callbacks
Secondly, the goals of the tests included automating the integration testing with the Apollo client and cache management with respect to:
infinite scrolling CX,
incremental paging of results,
cursor management with respect to FireFly, and
(if possible) use the mechanism to create some level of headless scrolling performance tests.
During the development of the infinite scrolling mechanism several issues/bugs were uncovered during debugging using manual testing. These included:
Issues embedding a Virtual scrolling List within a static Scrollable view. There are issues when trying to embed a virtual scrollable list within a fixed scrollable list component. The solution is to pass the “wrapping” scrollable view as as a
listHeaderComponentparameter to the FlatList (see note). This holds true forFlashList as well, but with the current implementation the returned error is not obvious: under the covers theonEndReachedcall back is called continuously when the list loads initially until all of the tracks in the playlist have been consumed. Needless to say, this is undesirable.Duplicate results being merged into the track list: due to some undocumented behavior of the
onUpdatecallback.
So the first test doesn’t even involve scrolling at all. Its just a matter of loading the PDP and peering into the cache and seeing if it has the expected contents (25 results vs. all of them).
The second test involves scrolling. To do so, we leverage the FireEvent.scroll mechanism of the React Native Testing Library as outlined for testing a FlatList.
React native Test Library Render(): What is on the screen?
The React Native test library adds mechanisms to Jest that allow the RN components to be rendered to a virtual screen of sorts. Indeed the screen variable is updated with the RenderResult of the RN test library render() function. Think of this as a virtual dom with base React Native components (hence, is in a somewhat intermediate representation). The test library provides utilities to probe if things appear or are visible on that screen/dom. But it is not exactly clear how one can tell what is “on the screen” or would be “visible” to our user. This is of particular importance to scroll-based tests. In the the following we explore that behavior to understand the bounds of what can be tested and what perhaps can’t. Note: some of this might change in future releases of the underlying products.
A single Playlist track row is “rendered” into its base React Native components and our track title shows up as a basic text element (pulled from screen.debug():
                                 <View
                                      style={
                                        Object {
                                          "flexDirection": "row",
                                        }
                                      }
                                    >
                                      <Text
                                        style={
                                          Array [
                                            Array [
                                              Object {
                                                "color": "rgb(255, 255, 255)",
                                                "fontFamily": "AmazonEmber-Regular",
                                                "fontSize": 15,
                                                "lineHeight": 20,
                                              },
                                            ],
                                            false,
                                            false,
                                          ]
                                        }
                                      >
 our track title "on screen" ----->       title-11
                                      </Text>
                                    </View>
                                    <View
                                      style={
                                        Object {
                                          "flexDirection": "row",
                                        }
                                      }
                                    >
                                      <Text
                                        style={
                                          Array [
                                            Array [
                                              Object {
                                                "color": "rgba(255, 255, 255, 0.6)",
                                                "fontFamily": "AmazonEmber-Regular",
                                                "fontSize": 14,
                                                "lineHeight": 18,
                                              },
                                              Object {
                                                "fontSize": 14,
                                                "lineHeight": 18,
                                              },
                                            ],
                                            false,
                                            false,
                                          ]
                                        }
                                      >
 Our track artist "on screen" --->      Dave Brubeck
                                      </Text>
                                    </View>
Figure 2: Track title and artist name on rendered virtual dom.
The above is an excerpt from the console output of screen.debug() and is just of few of the 21,000 lines of that output. To find out from that output what rows are on the screen (for this test) it is just a matter of grepping for the expected titles:
bueche@c889f3bd2e05 RN % grep  "  title-" screen.dump.win2.initial.load.txt
                                        title-0
                                        title-1
                                        title-2
                                        title-3
                                        title-4
                                        title-5
                                        title-6
                                        title-7
                                        title-8
                                        title-9
                                        title-10
                                        title-11
Figure 3: Visible tracks after initial playlist load
This is similarly true for the playlist title:
                           <Text
                              style={
                                Array [
                                  Array [
                                    Object {
                                      "color": "rgb(255, 255, 255)",
                                      "fontFamily": "SharpGroteskPESmBld-20",
                                      "fontSize": 32,
                                      "lineHeight": 40,
                                    },
                                    Object {
                                      "fontSize": 32,
                                      "lineHeight": 40,
                                    },
                                  ],
                                  false,
                                  false,
                                ]
                              }
                            >
Our "visible"  playlist title -->  foo-bar playlist
                            </Text>
Figure 4: Playlist title in the virtual dom
Scrolling on a real device vs. the headless one.
Now given the above one can see some differences between a real device and the headless one provided by the test library. Lets discuss some of these.
First, there seems to be always 12 rows on the virtual screen no matter how far down the list we scroll. That is, in these tests after loading up the next set of rows and scrolling down a bit the visible rows look like:
bueche@c889f3bd2e05 RN %grep "  title-" screen.debug.after.1st.scroll.wait30.txt
                                        title-23
                                        title-24
                                        title-25
                                        title-26
                                        title-27
                                        title-28
                                        title-29
                                        title-30
                                        title-31
                                        title-32
                                        title-33
                                        title-34
Figure 5: visible tracks after scrolling down
and our playlist title is still visible:
bueche@c889f3bd2e05 RN % grep "foo" screen.debug.after.1st.scroll.wait30.txt
 foo-bar playlist
This differs from the “actual” screen in two ways:
the playlist head metadata will scroll off the screen as we scroll down and
the number of visible results will increase as the head metadata scrolls off.
This is illustrated below:
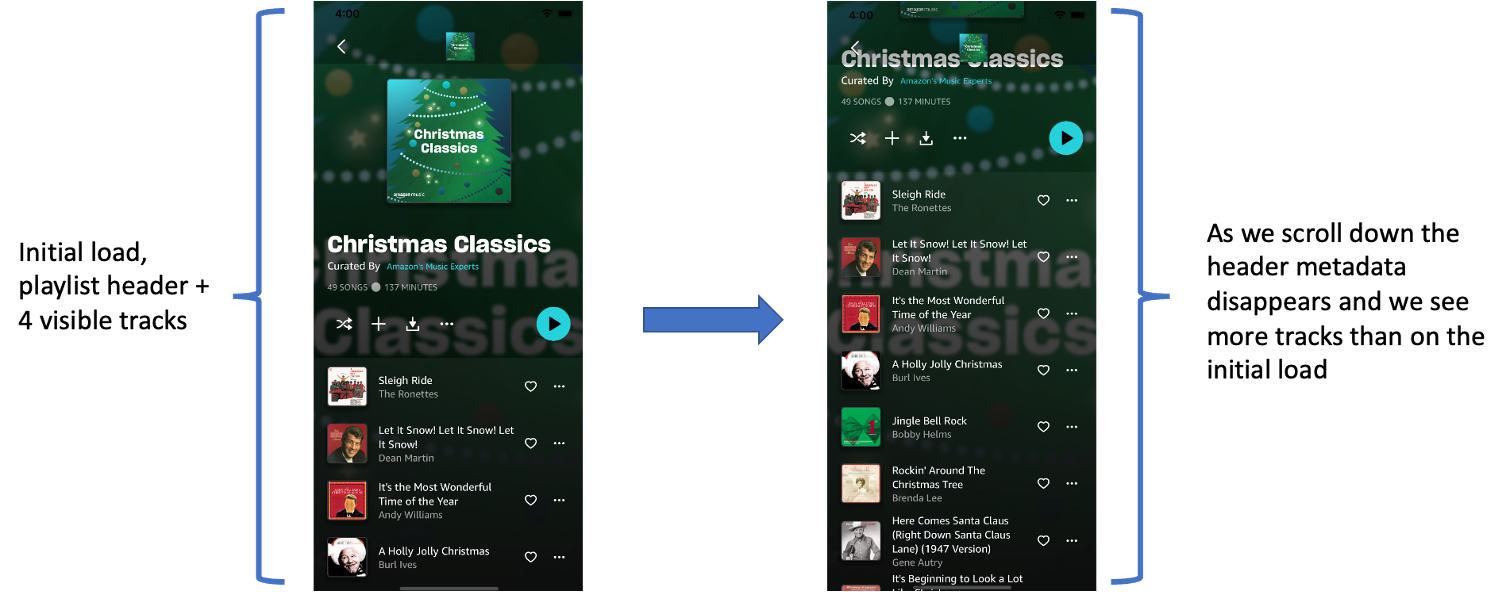 Figure 6: Illustration of changing number of tracks visible due to header and result scrolling as a unit
It is unclear if this is a limitation of the FlashList support of the test library or a general limitation. But one implication is that if a code change breaks the behavior of the playlist header scrolling with the results, then the headless tests will not be able to detect this. Also, its not quite clear (yet) how to control the number of viewable tracks in view.
In addition, the model of the scroll is different. A scroll on a real (or virtual device) comes from pressing an item and flicking or moving it up the screen. So your focus is on the item moving it up to reveal more. This is illustrated below.
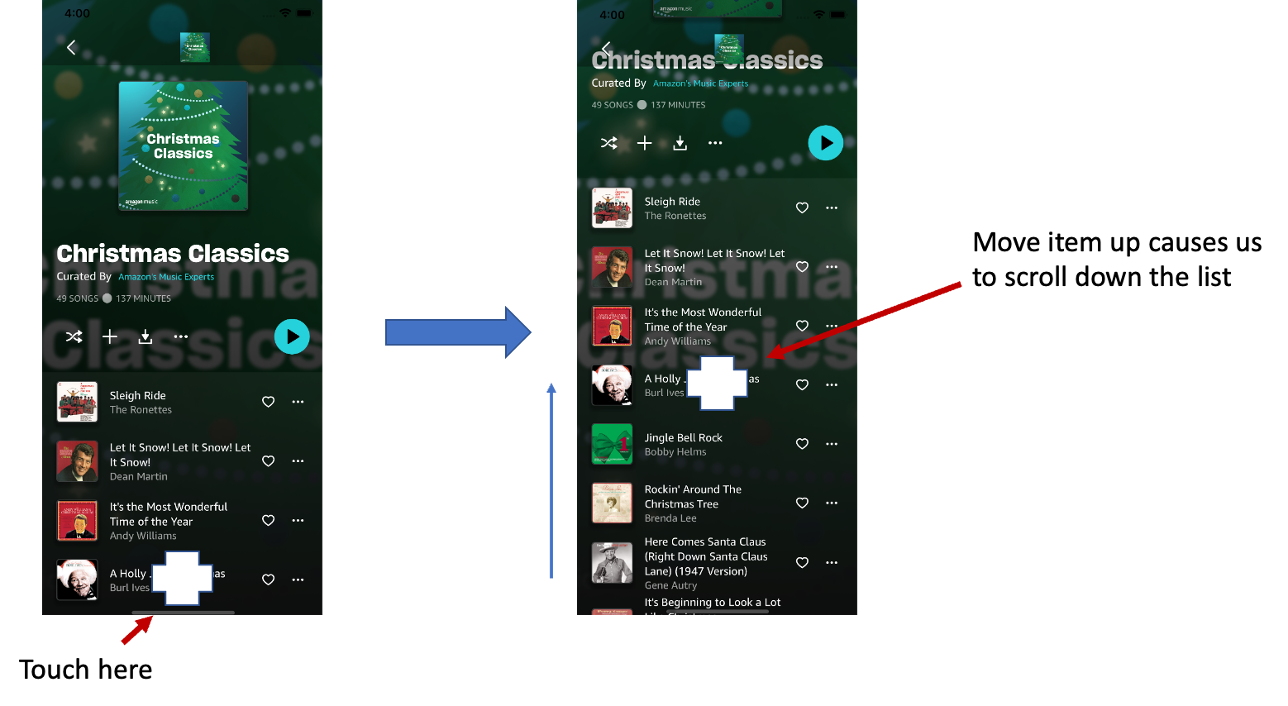 Figure 7: Concept and mental model of scrolling on a real device
Now, this model is different with the test library fireEvent.scroll as it has one start with some reference item and then define what point or row will be at the top of the screen. That is, in the following sequence the focus is on the playlist title and the content underneath it is defined to be 2000 pixels (this is visible and non-visible) and the contentOffsite is defining what is at the top of the scrollable view after the scroll happens.
fireEvent.scroll(screen.getByText(playlistTitle), {
      nativeEvent: {
        //  2000 is used here as trackRowSize (i.e., 80 pixels in row height) * 25 (track count)
        contentSize: { height: 2000, width: 100 },
        // We have scrolled this far so should hit another page load. This contentOffset.y number represents
        // what content will be displayed at the top of the screen.
        contentOffset: { y: 1900, x: 0 },
        layoutMeasurement: { height: 100, width: 100 }, // Dimensions of the device
      },
Figure 8: Example scroll in test code
We can predict what element ends up at top by how far down the content we scrolled. So in the above example,
1900/80 = 23.75 so row 23 will be at the top of the result list. Using our screen.debug() output notice that after the initial load (Figure 3 above) that title-0 is at the top, but after the scroll above title-23 is at top (Figure 5 above).
But what happens if we scroll down to the end? If we “place” a result that is almost at the end at the top of the result list, then some of the previous displayed results remain. This is shown below as 3500/80 = 43.75 so the 44th track (title-43) will be at the top. In addition, there will be some phantom rows still in view of this headless screen (titles-30 - 34). All of this is illustrated below.
fireEvent.scroll(screen.getByText(playlistTitle), {
      nativeEvent: {
        // Used 4000 here TrackRowSize (i.e., 80 pixels in row height) * 50 (track count)
        contentSize: { height: 4000, width: 100 },
        // We have scrolled this far so should hit another page load
        contentOffset: { y: 3500, x: 0 },
        layoutMeasurement: { height: 100, width: 100 }, // Dimensions of the device?
      },
    })
Figure 9: Next scroll, much farther down to the end of the results.
bueche@c889f3bd2e05 RN % grep "   title-" screen.debug.after.2nd.waiting.for.45.txt
                    title-43 <--- top
                    title-44
                    title-45
                    title-46
                    title-47
                    title-48
                    title-49 <--- last result
                    title-30
                    title-31
                    title-32 <-- left over from previous render
                    title-33.    phantom rows still in the virtual
                    title-34.    dom.
Figure 10: Scroll to move title-43 to top of result
What about using the headless framework for performance testing?
This needs more research and exploration using tools like the Shopify performance library recently included in Dragonfly by Alberto (see his notes).
The actual rendering time of the React Native testing library + Apollo mocks are minimal vs the total Jest test execution time. That is, on my M1 laptop the three scrolling tests spend a total of 1.243 sec rendering which is 29 % of the total test execution time:
 time for initial page load = 216 ms (test 2, but assume same for test 1)
 time for initial page load = 216 ms (test 2)
 time for scroll update = 181 ms (test 2 ... this incudes 2nd GQL mock call)
 time for scroll without GQL = 83 ms (test 2)
 time for initial page load = 190 ms (test 3)
 time for scroll to track 13 = 129 ms for Track title = 12 (causes 2nd GQL mock call)
 time for scroll to track 14 = 76 ms for Track title-13
 time for scroll to track 15 = 43 ms for Track title-14
 time for scroll to track 16 = 58 ms for Track title-15
 time for scroll to track 17 = 51 ms for Track title-16

 sum of total rendering time = 1.243 secs (29% of total test execution time)
 total test execution time for three tests = 4.283 s
Its also important to point out that the actual native rendering calls are not actually happening. So when trying to model or represent the actual performance the headless render is clearly incorrect … but the next question is: can it still be a useful model? This is possible, but requires more study. I would recommend that we measure and track both the test execution time and the rendering time for all tests and watch how they vary.
FAQ
FAQ-0: What is fragile about the MockProvider responses?
Although this has changed to be less fragile, there is a possibility that the mocked Responses of the MockProvider get out of sync with the actual GQL query. The following is an example:
An id field was added in the curator element in GetPlaylistQuery.ts (see MR here):
import { gql } from '@apollo/client'

export const getPlaylistQueryGQL = gql`
  query playlistDetail($id: String!, $cursor: String!) {
    playlist(id: $id) {
      id
      url
      title
      trackCount
      duration
      eligibility {
        playback {
          canPlayOnDemand
          shuffleType
        }
        playbackSubscriptionTiers
        isDownloadable
        isPurchaseable
        isPreviewable
        isPrimeEligible
      }
      curator {
        name
        id   <--- Field added by [MR-129](https://gitlab.aws.dev/amazonmusic/musicdragonfly/dragonfly/-/merge_requests/129#388f80c2811a9892e2623d1976d37b7c6beba442) before integration tests were in the pipeline
      }
      images {
        url
        imageType
      }
      tracks(limit: 25, cursor: $cursor) {
So then, when running the test the mock creation failed because that id wasn’t defined here in the Mocked response template:
const mockForGetPlaylistQueryGQL = {
    request: {
      query: getPlaylistQueryGQL,
      variables: {
        id: playlistId,
        cursor: '',
      },
    },
    result: {
      data: {
        playlist: {
          curator: {.  <---- Checked in about the same time MR-165 (tests not in pipeline)
            name: "Amazon's Music Experts",  NO id field and merge detected no conflicts
          },
          duration: 0,
          images: [
            {
              url: playlistImage,
              width: 1400,
              height: 1390,
              aspectRatio: 1,
              imageType: 'PRIMARY',
            },
The gitlab merge mechanism allowed an automatic rebase to cleanly happen and the tests hadn’t yet been included in the pipeline. After the auto rebase and merge, when running the test manually later a message showed up in the log
console.error
    Missing field 'id' while writing result {
      "name": "Amazon's Music Experts"
    }

      at Function.error (../../node_modules/ts-invariant/lib/invariant.js:35:27)
      at node_modules/@apollo/client/cache/inmemory/writeToStore.js:148:38
          at Map.forEach (<anonymous>)
      at StoreWriter.Object.<anonymous>.StoreWriter.processSelectionSet (node_modules/@apollo/client/cache/inmemory/writeToStore.js:106:69)
      at StoreWriter.Object.<anonymous>.StoreWriter.processFieldValue (node_modules/@apollo/client/cache/inmemory/writeToStore.js:206:21)
      at node_modules/@apollo/client/cache/inmemory/writeToStore.js:119:43
          at Map.forEach (<anonymous>)
      at StoreWriter.Object.<anonymous>.StoreWriter.processSelectionSet (node_modules/@apollo/client/cache/inmemory/writeToStore.js:106:69)
      at StoreWriter.Object.<anonymous>.StoreWriter.writeToStore (node_modules/@apollo/client/cache/inmemory/writeToStore.js:35:24)
      at InMemoryCache.Object.<anonymous>.InMemoryCache.write (node_modules/@apollo/client/cache/inmemory/inMemoryCache.js:100:37)
      at InMemoryCache.Object.<anonymous>.ApolloCache.writeQuery (node_modules/@apollo/client/cache/core/cache.js:44:21)
      at update (node_modules/@apollo/client/cache/core/cache.js:64:23)
      at perform (node_modules/@apollo/client/cache/inmemory/inMemoryCache.js:222:39)
      at InMemoryCache.Object.<anonymous>.InMemoryCache.batch (node_modules/@apollo/client/cache/inmemory/inMemoryCache.js:244:13)
      at InMemoryCache.Object.<anonymous>.ApolloCache.updateQuery (node_modules/@apollo/client/cache/core/cache.js:58:21)
      at update (node_modules/@apollo/client/core/ObservableQuery.js:205:31)
      at perform (node_modules/@apollo/client/cache/inmemory/inMemoryCache.js:222:39)
      at InMemoryCache.Object.<anonymous>.InMemoryCache.batch (node_modules/@apollo/client/cache/inmemory/inMemoryCache.js:244:13)
      at node_modules/@apollo/client/core/ObservableQuery.js:201:38
And this caused the cache merge logic to fail and hence the test to fail in an odd spot. Research is needed to make the mocks more robust to the changes of the schema.